Fetch the Weather
 Lab: Displaying the Weather
Let's take an existing project that uses react-router (like your portfolio project or the dentist website) and add a page to it that accepts a location and displays the weather.
You will need:
Fetch or axios
Temperature conversion functions
React-router
Create forms that store data with local state
Implement the Fetch API
Resources:
Time to show off! You're going to display the weather on your app.
You'll use the OpenWeather API to fetch weather information from a certain zip code and update your blog to display the current weather.
Solution
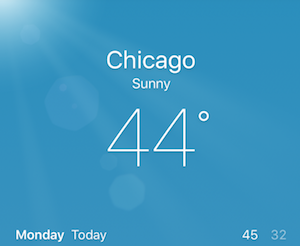
At the end of this exercise, your solution will look something like what's shown here.
Requirements
Make a new component called Weather and make a route for rendering it with react-router. If you need reminders of how to do this, peek back at the react-router lessons or take a look at how you did it in the dentist website.
On your Weather page, ask the user to input a zip code.
You can learn more about forms here.
When this event fires, take the
event.target.valueandfetch()from the OpenWeather API.
Use the response from the API to display the current temperature, the high and low temperatures, the current weather description, and the name of the city.
Note: Our solution uses Fahrenheit. You're free to use Celsius or Kelvins if you'd like.
Important Notes:
Because the OpenWeather API is not an open API, every request must end with this API key:
As an example, this is a URL to which you might send a
fetch()request:```js let API_KEY = '052f26926ae9784c2d677ca7bc5dec98'; // use this API KEY let zipcode = '60614';60614
let openWeatherMapUrl = http://api.openweathermap.org/data/2.5/weather?zip=${zipcode},us&appid=${API_KEY};
Need a Hint or Two?
Hint 1
You'll only need to create and implement the Weather component. Nothing else needs to change in whichever existing app you created other than hooking up the component to a route with your router!
Hint 2 To see how to handle the form, check out the skeleton code.
Bonus
Here are some extra ideas to challenge yourself if you have time:
Last updated