
oAuth
Objectives
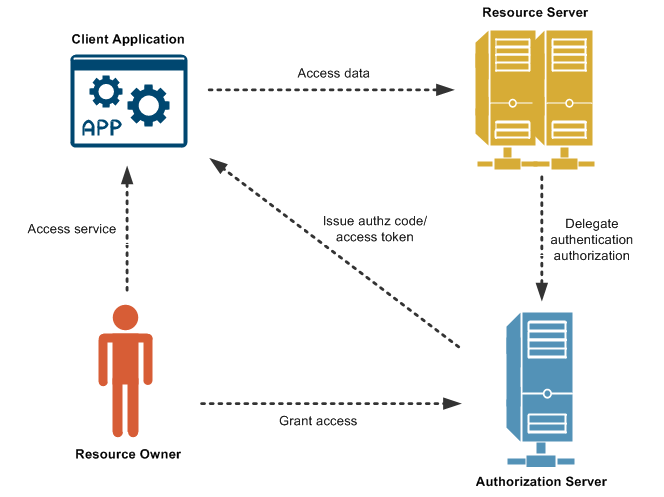
List the concepts behind using OAuth
Use a third-party gem in order to implement authentication strategies
Use environment variables to hide sensitive data when implementing OmniAuth strategies
Starter Code
This lesson uses starter code, provided here: https://github.com/WDI-SEA/oh-auth-example
Review
For a review of OAuth, look back at our experience using OAuth with Passport in Express
Setting Up OAuth
In this example, a sample application is setup for you, with a main controller and an index page. Look at the structure of the application and understand the components.
Now, we're going to setup the user model we'll need for this app.
Generate the user model
provider_hash- the hash we get from the OAuth provider (such as Facebook, Twitter, etc.)providerandprovider_id- the Oauth provider name and id we're using
Note that in this example, we're only providing OAuth for one provider. If we wanted to support multiple providers, we would need a separate provider model with a one-to-many association with the user.
Create the database and table
Quickly test your model
Make sure your user can be queried.
Add OmniAuth
Similar to how Passport had a core package and different "strategies" to implement, Rails has a gem called OmniAuth with different strategies to implement. Note that in this case, OmniAuth is used as middleware. So let's install the gems we need!
We'll be adding OAuth with Facebook, so in Gemfile, add omniauth and the strategy gem for each oauth provider you want to support. Full list of supported strategies.
Gemfile
After updating the Gemfile, remember to run bundle.
Init OmniAuth
Create a new file called omniauth.rb in the config/initializers folder of the Rails application
Add an initializer for each strategy/provider you want to support. We're accessing properties of the ENV object, which we'll set up with a .env file.
Any additional providers would go under the OmniAuth::Builder block.
Create apps with providers
Now you need to go to Facebook and create an app. This will allow you to get the key/secret for each service which you can set in your environment variable. When using Facebook, don't forget to set the Site URL in settings as http://localhost:3000
Again, the workflow for including keys/secrets:
store keys locally in a
.envfile.Run your app using
foreman run rails saccess keys via the
ENVarray (for example,ENV['FACEBOOK_KEY'])
NOTE: remember to add .env to your .gitignore file to avoid exposing your keys on github.
Quicklinks for API key creation
Create auth routes
Like many things in rails OmniAuth uses convention over configuration so it has pre-defined routes that you are expected to use.
/auth/:providerlogin route, created for us, redirects user to the appropriate provider.
/auth/failureuser is sent here on authentication failure
/auth/:provider/callbackcallback url. This is where the user is redirected after they come back from the provider.
Let's set these routes up.
add to config/routes.rb
Now that we have routes, we can create the auth controller and start implementing the callback, logout, and failure controller actions. Also, we don't have to implement the /auth/:provider route explictly, because OmniAuth does that for us.
Note that since we're still using session authentication, the logout method be nearly the same. The failure method, for now, will just render an error message as text. Therefore, we really need to worry about the implementation of the callback method.
Callback method
The callback method will perform the following operation:
Obtain the provider information from Facebook
Find or create a user with the provider and provider id
Add the name, email, and hash of the user (the hash being the token from the provider user)
Create a session (same as before)
Redirect
Lastly, make sure to setup your @current_user variable inside the ApplicationController and run before_action :current_user in any controller that depends on having the user logged in.
controllers/main_controller.rb
Now test your code and verify that you can login.
Conclusion
Adding OAuth via OmniAuth to your application is similar to implementing Passport with Express. A summary of the steps we took:
Create a user model with the provider attributes
Add the OmniAuth middleware and strategies
Configure API keys (if necessary)
Define routes and controller methods
Apply a before_action to make the current user available on specific pages
Last updated