📂
SEI 1019
  • Introduction
  • About These Notes
  • Syllabus
  • Development Workflow
    • Command Line
      • The Terminal
      • Filesystem Navigation
      • File Manipulation
      • Additional Topics
    • Intro to Git
      • Version Control
      • Local Git
      • Remote Git
      • Git Recipes
    • Group Collaboration
      • Git Workflows
      • Project Roles and Tools
    • VS Code Tips & Tricks
  • HTML/CSS
    • HTML
    • CSS Selectors
    • CSS Box Model and Positioning
      • Box Model
      • Display and Positioning
      • Flexbox
      • Grid
      • Flexbox & Grid Games
      • Floats and Clears
      • Additional Topics
    • Advanced CSS
      • Responsive Design
      • Pseudo-Classes/Elements
      • Vendor Prefixes
      • Custom Properties
      • Additional Topics
    • Bootstrap
    • CSS Frameworks
    • Accessibility
  • JavaScript
    • Primitives
    • Arrays
    • Objects
    • Control Flow
      • Boolean Expressions
      • Conditionals
      • Loops
      • Promises
    • Functions
      • Callbacks
      • Timing Functions
      • Iterators
    • DOM and Events
    • DOM Manipulation
    • HTML5 Canvas
    • How To Reduce Redundancy
    • (2019) JavaScript OOP
    • (2016) OOP with Classes
    • (1995) OOP with Prototypes
      • Constructors
      • Prototypes
    • Intro to TDD
    • Scoping
    • Inheritance
      • Prototypal Inheritance
      • Call, Apply, and other Functions
      • ES6 Inheritance
      • Resources
    • Custom Node Modules
    • Additional Topics
      • AJAX, Fetch, and Async/Await
      • AJAX w/JSON and Localstorage
        • AJAX w/JSON
        • Local Storage
      • Async module
      • Data Scraping
  • jQuery
    • Intro
      • DOM Manipulation
      • Reddit Practice
      • Styling
      • Events
    • Plugins
    • AJAX
  • APIs
    • Fetch
    • AJAX w/jQuery
    • AJAX w/Fetch
  • Databases
    • Intro to SQL
    • Advanced SQL
    • MongoDB
      • Intro to NoSQL
      • CRUD in MongoDB
      • Data Modeling
      • Intermediate Mongo
  • Node/Express
    • Node
      • Intro to Node
      • Node Modules
      • Node Package Manager (NPM)
    • Express
      • Intro to Express
        • Routes
        • Views
        • Templates
        • Layouts and Controllers
        • CRUD & REST
          • Get and Post
          • Put and Delete
      • APIs with Express (request)
      • APIs with Express (axios)
    • Sequelize
      • Terminology
      • Setup
      • Using Models
      • Seeding Data
      • Validations and Migrations
      • Resources
      • 1:M Relationships
      • N:M Relationships
    • Express Authentication
      • Research Components
      • Code Components
      • Auth in Theory
        • Sessions
        • Passwords
        • Middleware
        • Hooks
      • Auth in Practice
        • Create the User
        • User Signup
        • Sessions
        • User Login
        • Authorization and Flash messages
    • Testing with Mocha and Chai
    • Mongoose
      • Mongoose Associations
    • JSON Web Tokens
      • Codealong
    • Additional Topics
      • oAuth
      • Geocoding with Mapbox
      • Geocoding and Google Maps
      • Cloudinary
      • Websockets with Socket.io
      • SASS
  • Ruby
    • Intro to Ruby
    • Ruby Exercises
    • Ruby Classes
    • Ruby Testing with Rspec
    • Ruby Inheritance
    • Ruby Data Scraping
  • Ruby on Rails
    • Intro to Rails
    • APIs with Rails
    • Asset Pipeline
    • Rails Auth and 1-M
      • Auth Components
    • Rails N:M
    • ActiveRecord Polymorphism
    • Additional Topics
      • oAuth
      • SASS
      • Rails Mailers
      • Cloudinary
      • Jekyll
  • React (Updated 2019)
    • ES6+/ESNext
      • Const and Let
      • Arrow Functions
      • Object Literals and String Interpolation
      • ES6 Recap
      • ES6 Activity
    • Intro to React
      • Create React App
      • Components and JSX
      • Virtual DOM
      • Props
      • Dino Blog Activity
      • Nested Components
      • Lab: LotR
    • React State
      • Code-Along: Mood Points
      • Code-Along: Edit Dino Blog
      • Lab: Simple Calc
      • Lifting State
    • React Router
      • Browser History/SPAs
      • React Router (lesson and full codealong)
      • Router Lab
    • Fetch and APIs
      • APIs with Fetch and Axios
      • Fetch the Weather
    • React Hooks
    • React LifeCycle
      • Lab: Component LifeCycle
    • React Deployment
    • Additional Topics
      • React Frameworks
        • Material UI Theming
      • Typescript
        • More Types and Syntax
        • Tsconfig and Declaration Files
        • Generics with Linked List
      • Redux
      • TypeScript
      • Context API
      • React Native
  • Meteor
  • Deployment and Config
    • Installfest
      • Mac OSX
      • Linux
      • Git Configuration
      • Sublime Packages
    • Deploy - Github Pages
    • Deploy - Node/Sequelize
    • Deploy - Node/MongoDB
    • Deploy React
    • Deploy - Rails
      • Foreman (Environment Variables)
    • Deploy - AWS Elastic Beanstalk
    • Deploy - S3 Static Sites
    • Deploy - Django
    • Deploy - Flask
  • Data Structures and Algorithms
    • Recursion
    • Problem Solving - Array Flatten
    • Binary Search
    • Algorithm Complexity
    • Stacks and Queues
    • Bracket Matching
    • Ruby Linked Lists
      • Sample Code
      • Beginner Exercises
      • Advanced Exercises
    • JS Linked Lists
      • Sample Code
      • Beginner Exercises
      • Beginner Solutions
    • Hash Tables
    • Intro to Sorting
    • Insertion Sort
    • Bucket Sort
    • Bubble Sort
    • Merge Sort
    • Quick Sort
    • Heap Sort
    • Sorting Wrapup
    • Hashmaps
    • Trees and Other Topics
  • Python
    • Python Installation
    • Intro to Python
    • Python Lists
    • Python Loops
    • Python Dictionaries
    • Python Sets and Tuples
    • Python Cheatsheet
    • Python Functions
    • Python Classes
    • Python Class Inheritance
    • Intro to Flask
    • Intro to SQLAlchemy
      • Flask and SQLAlchemy
    • Using PyMongo
    • Intro to Django
    • CatCollector CodeAlong
      • URLs, Views, Templates
      • Models, Migrations
      • Model Form CRUD
      • One-to-Many Relations
      • Many-to-Many Relations
      • Django Auth
    • Django Cheatsheet
    • Django Auth
    • Django Polls App Tutorial
    • Django School Tool Tutorial
    • Django 1:M Relationships
    • Custom Admin Views
    • Data Structures and Algorithms
      • Recursion
      • Binary Search
      • Stacks and Queues
      • Linked Lists
      • Binary Trees
      • Bubble Sort
      • TensorFlow & Neural Networks
    • Adjacent Topics
      • Raspberry Pi
      • Scripting
  • Assorted Topics
    • History of Computer Science
    • Regular Expressions
    • Intro to WDI (Course Info)
    • Being Successful in WDI
    • Internet Fundamentals
      • Internet Lab
    • User Stories and Wireframing
      • Wireframing Exercise: Build an Idea
    • Post WDI
      • Learning Resources
      • Deliverables -> Portfolio
      • FAQ
  • Projects
    • Project 1
    • Project 2
    • Project 3
      • Project 3 Pitch Guidelines
    • Project 4
    • Past Projects
      • Project 1
      • Project 2
      • Project 3
      • Project 4
      • Portfolios
    • Post Project 2
    • MEAN Hackathon
      • Part 1: APIs
      • Part 2: Angular
    • Portfolio
  • Web Development Trends
  • Resources
    • APIs and Data
    • Tech Websites
    • PostgreSQL Cheat Sheet
    • Sequelize Cheat Sheet
    • Database Administration
  • Archived Section
    • (Archived) ReactJS
      • Intro to React
        • Todo List Codealong
        • Additional Topics
      • Deploy React
      • React with Gulp and Browserify
        • Setting up Gulp
        • Additional Gulp Tasks
      • React Router
        • OMDB Router
        • OMDB Search
        • Additional Resources
      • React Animations
        • CSS Animations
    • AngularJS
      • Intro to AngularJS
        • Components and SPA
        • Create an Angular App
      • Angular Directives and Filters
      • Angular Animation
      • Angular Bootstrap Directives
        • Bootstrap Modals
      • Angular $http
      • Angular Services
        • Service Recipes
        • ngResource
        • Star Wars Codealong
      • Angular Routing
      • Angular + Express
      • Angular Authentication
        • Additional Topics
      • Angular Components
      • Angular Custom Filters
      • Angular Custom Directives
Powered by GitBook
On this page
  • Objectives
  • What is CSS?
  • Let's write some CSS - Codealong
  • Differences between Classes and IDs
  • Specificity in CSS
  • Calculating specificity
  • Conclusion

Was this helpful?

  1. HTML/CSS

CSS Selectors

Objectives

  • Describe the syntactical and functional relationship between selectors, properties, and values

  • Style all elements of a particular HTML element on a web page

  • Describe the difference between class and id selectors

  • Describe the heirarchy (order of precedence) between tag selectors, class selectors, id selectors, and inline-styles

  • Demonstrate ability to include CSS inline, with a style tag, and from an external file

  • Apply styles to specific elements by selecting elements with classes and ids

  • Apply a set of styles to children of a specific class or tag

What is CSS?

If HTML is a set of instructions telling the browser what to display, CSS tells it how to display it.

CSS stands for:

  • Cascading

  • Style

  • Sheet

It provides the browser with precise instructions on how to style each element we want displayed on the page and can affect the text format - like font, size, color - the size and position of various objects on the page, colors, spacial layouts, etc. There are literally hundreds of different properties we can use to style HTML elements on a webpage.

Let's write some CSS - Codealong

Create a new folder with a HTML page:

$ mkdir css-basics
$ cd css-basics
$ touch index.html

First, add a basic HTML structure to your index.html file:

<!DOCTYPE html>
<html>
  <head>
    <meta charset="UTF-8">
    <title>Intro to CSS</title>
  </head>
  <body>

  </body>
</html>

Adding CSS

There are three different ways to use CSS to style your HTML:

  • External style sheet

  • Internal Style sheet

  • Inline style

Let's take a look at each one.

Inline CSS

If you're looking to add a unique style for a single HTML element, you can use an inline style. It can also be used to test different styles, initially, or for quick fixes, as it's much easier to change a single element on the page than to find and change the source CSS file.

To use inline styles, add the style attribute to the relevant tag. The style attribute can contain any CSS property. The example shows us changing the HTML body's background to red:

<!DOCTYPE html>
<html>
  <head>
    <meta charset="UTF-8">
    <title>Intro to CSS</title>
  </head>
  <body style="background:red">

  </body>
</html>

Open this HTML file in browser and let's see what we have - a red page!

Style Sheets

Style sheets can be written in your HTML (internal) or in a separate CSS file (external). Whatever style sheet you use, the CSS syntax is the same. We build our CSS with a selector - usually the name of the HTML tag, a specific class of elements, or an element with a unique ID:

selector {
  property_1: value_1;
  property_2: value_2;
}

Do not forget the curly brackets or the semi-colon after the value!

The last semi-colon can be omitted but it's optional.

Internal Style Sheets

If a single page has a unique style, you could use an internal style sheet - these are defined and written in your HTML using the <style> element, inside the head section of an HTML page:

<!DOCTYPE>
<html>
  <head>
    <style>
      body {
        background: black;
      }
    </style>
    <title>Intro to CSS</title>
  </head>
  <body>

  </body>
</html>

Just like before, if you open the index.html with your browser, you'll notice the body background has changed. We've selected the body element and instructed the browser to color it black.

External Style Sheets

With just one file - your external style sheet - you can modify the styles of your entire website. That's really powerful and helps keep your code organized and separate.

To link the stylesheet to the HTML file, inside the <head> tags, we need to add a self-closing <link> tag, indicating the type of relations (rel="stylesheet") and the file path. But first, let's create a css file within our css directory.

mkdir css
touch css/style.css

Then we can move the CSS from our internal style sheet to our external style sheet and add the file path (href="css/style.css") to our HTML file:

<!DOCTYPE html>
<html>
  <head>
    <meta charset="UTF-8">
    <title>Intro to CSS</title>
    <link rel="stylesheet" href="css/style.css">
  </head>
  <body>

  </body>
</html>

We often have a specific folder for stylesheets, as we can have several in one application, and we're doing that now with our /css folder.

We need to create a css file

touch style.css

And let's add some more html to our index.html:

<!DOCTYPE html>
<html>
  <head>
    <meta charset="UTF-8">
    <title>Intro to CSS</title>
    <link rel="stylesheet" href="css/style.css">
  </head>
  <body>
    <p>This is a paragraph element</p>

    <div>This is a DIV</div>
    <div>This is another DIV</div>
  </body>
</html>

Now, let's add the CSS we had - plus some more - to our stylesheet file:

body {
  background: red;
}

p {
  color: orange;
}

div {
  border-width: 1px;
  border-style: solid;
  border-color: black;
}

Our body rule is still applied, and these new rules will change the color of all paragraph tags to have the font-color "orange" and add a 1px black border to each DIV on the page, since the selector targets the "div" elements. Refresh your browser and check it out.

Luckily for us, CSS gives us some nice shortcuts that we'll go over throughout this lesson, and we can combine the div border styles into this:

div {
  border: 1px solid black;
  /*border-width: 1px;
  border-style: solid;
  border-color: black;*/
}

Notice, we can comment out CSS with `/* your css */.

Differences between Classes and IDs

The Class Selector

The class selector finds elements with a specific class, and as an attribute, class allows us to target several elements that may share similarities. Note that:

  • Classes are NOT unique

  • You can use the same class on multiple elements

  • You can use multiple classes on the same element

  • You can select a class using .class-name {}

Watch me add some HTML to our index.html and then style those elements by selecting the classes associated with them:

<!DOCTYPE html>
<html>
  <head>
    <meta charset="UTF-8">
    <title>Intro to CSS</title>
    <link rel="stylesheet" href="css/style.css">
  </head>
  <body>
    <p>This is a paragraph element</p>

    <div>This is a DIV</div>
    <div>This is another DIV</div>

    <div class="comments">
      Hello
    </div>

    <div class="comments">
      Hello
    </div>

    <div class="comments">
      Hello
    </div>

  </body>
</html>

Now, for the style:

body {
  background: red;
}

p {
  color: orange;
}

div {
  border: 1px solid black;
}

.comments {
  font-weight: bold;
  color: #64FE2E; /* green */
}

If I refresh my browser, I see the updates. The browser selects all elements on the page with the comments class and alters the font-weight and color.

The ID Selector

The ID selector uses the id attribute of an HTML tag to find one specific element. We can give any name we want to our ID attribute, besides the obvious reserved words, such as tag names, etc.

  • An ID is unique within a page.

  • You should use the id selector when you want to find a single, unique element.

  • In the CSS document, you use a hashtag (#) to denote an ID

How about we try it out? Altering the HTML:

<!DOCTYPE html>
<html>
  <head>
    <meta charset="UTF-8">
    <title>Intro to CSS</title>
    <link rel="stylesheet" href="css/style.css">
  </head>
    <body>
    <p>This is a paragraph element</p>

    <div>This is a DIV</div>
    <div>This is another DIV</div>

    <div class="comments">
      Hello
    </div>

    <div class="comments">
      Hello
    </div>

    <div class="comments">
      Hello
    </div>

    <section id="dolphin">
      I am a dolphin
    </section>

    </body>
</html>

And now the style:

body {
  background: red;
}

p {
  color: orange;
}

div {
  border: 1px solid black;
}

.comments {
  font-weight: bold;
  color: #64FE2E; /* green */
}

#dolphin {
  font-style: italic;
  color: #0040FF; /*blue*/
}

Sweet!

Multiple classes and multiple elements

You can also chain classes together, applying several classes to one element:

Let's add:

<!DOCTYPE html>
<html>
  <head>
    <meta charset="UTF-8">
    <title>Intro to CSS</title>
    <link rel="stylesheet" href="css/style.css">
  </head>

  <body>
    <p>This is a paragraph element</p>

    <div>This is a DIV</div>
    <div>This is another DIV</div>

    <div class="comments">
      Hello
    </div>

    <div class="comments">
      Hello
    </div>

    <div class="comments">
      Hello
    </div>

    <section id="dolphin">
      I am a dolphin
    </section>

    <p class="first second">Multiple classes</p>

    </body>
</html>

Then, create two classes:

body {
  background: red;
}

p {
  color: orange;
}

div {
  border: 1px solid black;
}

.comments {
  font-weight: bold;
  color: #64FE2E; /* green */
}

#dolphin {
  font-style: italic;
  color: #0040FF; /*blue*/
}

.first {
  font-size: 40px;
}

.second {
  color: red;
}

As we can imagine, the possibilities are endless. There are many properties and values to work with and many ways to target specific elements. Two pages could have the same HTML content, and yet look dramatically different due to different CSS stylesheets.

We can even use classes/IDs with elements to select and style HTML. Lets add a short unordered list:

<!DOCTYPE html>
<html>
  <head>
    <meta charset="UTF-8">
    <title>Intro to CSS</title>
    <link rel="stylesheet" href="css/style.css">
  </head>

  <body>
    <p>This is a paragraph element</p>

    <div>This is a DIV</div>
    <div>This is another DIV</div>

    <div class="comments">
      Hello
    </div>

    <div class="comments">
      Hello
    </div>

    <div class="comments">
      Hello
    </div>

    <section id="dolphin">
      I am a dolphin
    </section>

    <p class="first second">Multiple classes</p>

    <ul>
      <li class="why">Why a dolphin?</li>
      <li class="why" id="not">Why not?</li>
    </ul>
  </body>
</html>

Imagine, we wanted to particular style to apply to all of the elements from the list but wanted other particular styles to apply to each item, individually. Definitely doable. Take a look at our CSS:

body {
  background: red;
}

p {
  color: orange;
}

div {
  border: 1px solid black;
}

.comments {
  font-weight: bold;
  color: #64FE2E; /* green */
}

#dolphin {
  font-style: italic;
  color: #0040FF; /*blue*/
}

.first {
  font-size: 40px;
}

.second {
  color: red;
}

li {
  text-align: center;
}

li.why {
  font-family: sans-serif;
}

li#not {
  font-family: serif;
}

Now, all our list items are centered but the top item has a different font than the bottom.

Specificity in CSS

One of the most important concepts with CSS is specificity. Imagine you select an element by it's class and give it some style; then, on the next line, you select the same element by it's element name and it's ID - how does the browser know what style to apply? Well, every element gets a score and it's this score that dictates what CSS property is applied.

Every selector has its place in the specificity hierarchy, and if two selectors apply to the same element, the one with higher specificity wins. Overall, there are four distinct factors that define the specificity level of a given selector: inline styles, IDs, classes+attributes and elements. You can calculate CSS specificity with CSS Specificity Calculator:
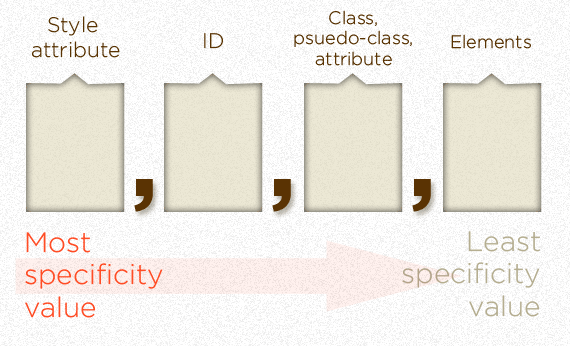
Calculating specificity
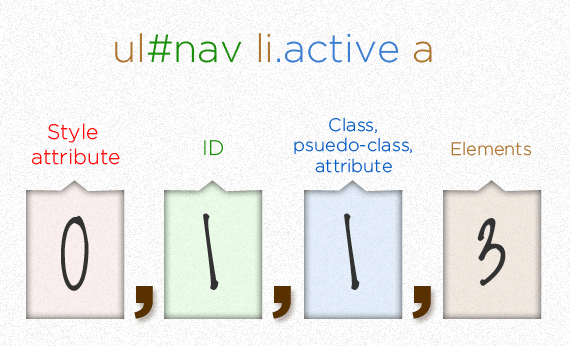
This is calculated as 113
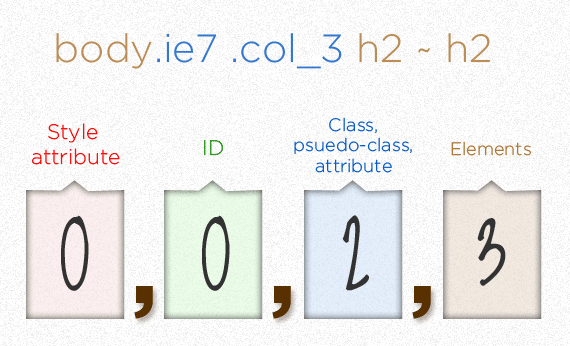
This is calculated as 23
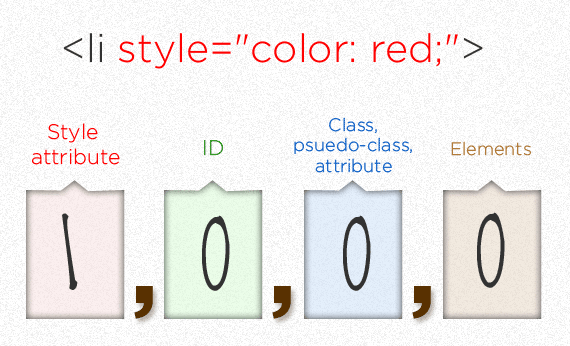
This is calculated as 1000

A couple of rules to think about:

  • If two selectors apply to the same element, the one with higher specificity wins

  • When selectors have an equal specificity value, the latest rule is the one that counts

  • When selectors have an unequal specificity value, the more specific rule is the one that counts

  • Rules with more specific selectors have a greater specificity

  • The last rule defined overrides any previous, conflicting rules

  • The embedded style sheet has a greater specificity than other rules

  • ID selectors have a higher specificity than attribute selectors

  • You should always try to use IDs to increase the specificity

  • A class selector beats any number of element selectors

-From SmahingMagazine.com

Conclusion

CSS can be really fun or a total nightmare. You have to remember a few rules, but once you have them remembered, it's great to see your webpage come to life as you imagined.

  • Describe the differences between classes and IDs.

  • Identify the popular CSS properities we used today.

  • What are the use cases for inline styling vs. internal/external style sheets?

PreviousHTMLNextCSS Box Model and Positioning

Last updated 4 years ago

Was this helpful?

Inline CSS has a lot of , though, so try to avoid using it on your projects and during class.

Speaking of fonts, check out for lots of cool fonts you can add to your websites!

calculationbase
calc 1
calc 2
calc 4]
downsides
Google Fonts
Specificity Calculator